The Netty Project 3.x User Guide
The Proven Approach to Rapid Network Application Development
Table of Contents
- 1. Preface
- 1. Getting Started
- 2. Architectural Overview
- 2. Frequently Asked Questions
Preface
Table of Contents
1. The Problem
Nowadays we use general purpose applications or libraries to communicate with each other. For example, we often use an HTTP client library to retrieve information from a web server and to invoke a remote procedure call via web services.
However, a general purpose protocol or its implementation sometimes does not scale very well. It is like we don't use a general purpose HTTP server to exchange huge files, e-mail messages, and near-realtime messages such as financial information and multiplayer game data. What's required is a highly optimized protocol implementation which is dedicated to a special purpose. For example, you might want to implement an HTTP server which is optimized for AJAX-based chat application, media streaming, or large file transfer. You could even want to design and implement a whole new protocol which is precisely tailored to your need.
Another inevitable case is when you have to deal with a legacy proprietary protocol to ensure the interoperability with an old system. What matters in this case is how quickly we can implement that protocol while not sacrificing the stability and performance of the resulting application.
2. The Solution
The Netty project is an effort to provide an asynchronous event-driven network application framework and tooling for the rapid development of maintainable high-performance · high-scalability protocol servers and clients.
In other words, Netty is a NIO client server framework which enables quick and easy development of network applications such as protocol servers and clients. It greatly simplifies and streamlines network programming such as TCP and UDP socket server development.
'Quick and easy' does not mean that a resulting application will suffer from a maintainability or a performance issue. Netty has been designed carefully with the experiences earned from the implementation of a lot of protocols such as FTP, SMTP, HTTP, and various binary and text-based legacy protocols. As a result, Netty has succeeded to find a way to achieve ease of development, performance, stability, and flexibility without a compromise.
Some users might already have found other network application framework that claims to have the same advantage, and you might want to ask what makes Netty so different from them. The answer is the philosophy where it is built on. Netty is designed to give you the most comfortable experience both in terms of the API and the implementation from the day one. It is not something tangible but you will realize that this philosophy will make your life much easier as you read this guide and play with Netty.
Chapter 1. Getting Started
Table of Contents
This chapter tours around the core constructs of Netty with simple examples to let you get started quickly. You will be able to write a client and a server on top of Netty right away when you are at the end of this chapter.
If you prefer top-down approach in learning something, you might want to start from Chapter 2, Architectural Overview and get back here.
1. Before Getting Started
The minimum requirements to run the examples which are introduced in this chapter are only two; the latest version of Netty and JDK 1.5 or above. The latest version of Netty is available in the project download page. To download the right version of JDK, please refer to your preferred JDK vendor's web site.
As you read, you might have more questions about the classes introduced in this chapter. Please refer to the API reference whenever you want to know more about them. All class names in this document are linked to the online API reference for your convenience. Also, please don't hesitate to contact the Netty project community and let us know if there's any incorrect information, errors in grammar and typo, and if you have a good idea to improve the documentation.
2. Writing a Discard Server
The most simplistic protocol in the world is not 'Hello, World!' but DISCARD. It's a protocol which discards any received data without any response.
To implement the DISCARD protocol, the only thing you need to do is to ignore all received data. Let us start straight from the handler implementation, which handles I/O events generated by Netty.
1 package org.jboss.netty.example.discard; 2 public class DiscardServerHandler extendsSimpleChannelHandler{4 @Override 6 public void messageReceived(
ChannelHandlerContextctx,MessageEvente) {} 8 @Override 10 public void exceptionCaught(
ChannelHandlerContextctx,ExceptionEvente) {e.getCause().printStackTrace(); 12
Channelch = e.getChannel(); 14 ch.close(); } 16 }
|
|
|
|
|
We override the |
|
|
|
So far so good. We have implemented the first half of the DISCARD server.
What's left now is to write the main method
which starts the server with the DiscardServerHandler.
1 package org.jboss.netty.example.discard; 2 import java.net.InetSocketAddress; 4 import java.util.concurrent.Executors; 6 public class DiscardServer { 8 public static void main(String[] args) throws Exception {ChannelFactoryfactory = 10 newNioServerSocketChannelFactory( Executors.newCachedThreadPool(), 12 Executors.newCachedThreadPool()); 14
ServerBootstrapbootstrap = newServerBootstrap(factory); 16 bootstrap.setPipelineFactory(new
ChannelPipelineFactory() {public
ChannelPipelinegetPipeline() { 18 returnChannels.pipeline(new DiscardServerHandler()); } 20 }); 22 bootstrap.setOption("child.tcpNoDelay", true);bootstrap.setOption("child.keepAlive", true); 24 bootstrap.bind(new InetSocketAddress(8080));
26 } }
|
|
|
|
|
|
|
|
Here, we configure the |
|
|
You can also set the parameters which are specific to the bootstrap.setOption("reuseAddress", true); |
|
|
We are ready to go now. What's left is to bind to the port and to
start the server. Here, we bind to the port |
Congratulations! You've just finished your first server on top of Netty.
3. Looking into the Received Data
Now that we have written our first server, we need to test if it really works. The easiest way to test it is to use the telnet command. For example, you could enter "telnet localhost 8080" in the command line and type something.
However, can we say that the server is working fine? We cannot really know that because it is a discard server. You will not get any response at all. To prove it is really working, let us modify the server to print what it has received.
We already know that MessageEvent is generated whenever data is
received and the messageReceived handler method
will be invoked. Let us put some code into the
messageReceived method of the
DiscardServerHandler:
1 @Override 2 public void messageReceived(ChannelHandlerContextctx,MessageEvente) {ChannelBufferbuf = (ChannelBuffer) e.getMessage(); 4 while(buf.readable()) { System.out.println((char) buf.readByte()); 6 System.out.flush(); } 8 }
|
|
It is safe to assume the message type in socket transports is always
Although it resembles to NIO |
If you run the telnet command again, you will see the server prints what has received.
The full source code of the discard server is located in the
org.jboss.netty.example.discard package of the
distribution.
4. Writing an Echo Server
So far, we have been consuming data without responding at all. A server, however, is usually supposed to respond to a request. Let us learn how to write a response message to a client by implementing the ECHO protocol, where any received data is sent back.
The only difference from the discard server we have implemented in the
previous sections is that it sends the received data back instead of
printing the received data out to the console. Therefore, it is enough
again to modify the messageReceived method:
1 @Override 2 public void messageReceived(ChannelHandlerContextctx,MessageEvente) {Channelch = e.getChannel(); 4 ch.write(e.getMessage()); }
|
|
A |
If you run the telnet command again, you will see the server sends back whatever you have sent to it.
The full source code of the echo server is located in the
org.jboss.netty.example.echo package of the
distribution.
5. Writing a Time Server
The protocol to implement in this section is the TIME protocol. It is different from the previous examples in that it sends a message, which contains a 32-bit integer, without receiving any requests and loses the connection once the message is sent. In this example, you will learn how to construct and send a message, and to close the connection on completion.
Because we are going to ignore any received data but to send a message
as soon as a connection is established, we cannot use the
messageReceived method this time. Instead,
we should override the channelConnected method.
The following is the implementation:
1 package org.jboss.netty.example.time; 2 public class TimeServerHandler extendsSimpleChannelHandler{ 4 @Override 6 public void channelConnected(ChannelHandlerContextctx,ChannelStateEvente) {
Channelch = e.getChannel(); 8ChannelBuffertime =ChannelBuffers.buffer(4);10 time.writeInt((int) (System.currentTimeMillis() / 1000L + 2208988800L)); 12
ChannelFuturef = ch.write(time);14 f.addListener(new
ChannelFutureListener() {public void operationComplete(
ChannelFuturefuture) { 16Channelch = future.getChannel(); ch.close(); 18 } }); 20 } 22 @Override public void exceptionCaught(ChannelHandlerContextctx,ExceptionEvente) { 24 e.getCause().printStackTrace(); e.getChannel().close(); 26 } }
|
|
As explained, |
|
|
To send a new message, we need to allocate a new buffer which will
contain the message. We are going to write a 32-bit integer, and
therefore we need a
On the other hand, it is a good idea to use static imports for
1 import static org.jboss.netty.buffer. |
|
|
As usual, we write the constructed message.
But wait, where's the
In contrast, NIO buffer does not provide a clean way to figure out
where the message content starts and ends without calling the
Another point to note is that the 1
Therefore, you need to call the |
|
|
How do we get notified when the write request is finished then?
This is as simple as adding a Alternatively, you could simplify the code using a pre-defined listener: f.addListener( |
To test if our time server works as expected, you can use the UNIX rdate command:
$ rdate -o <port> -p <host>
main() method and host is usually localhost.
6. Writing a Time Client
Unlike DISCARD and ECHO servers, we need a client for the TIME protocol because a human cannot translate a 32-bit binary data into a date on a calendar. In this section, we discuss how to make sure the server works correctly and learn how to write a client with Netty.
The biggest and only difference between a server and a client in Netty
is that different Bootstrap and ChannelFactory are required. Please
take a look at the following code:
1 package org.jboss.netty.example.time; 2 import java.net.InetSocketAddress; 4 import java.util.concurrent.Executors; 6 public class TimeClient { 8 public static void main(String[] args) throws Exception { String host = args[0]; 10 int port = Integer.parseInt(args[1]); 12ChannelFactoryfactory = newNioClientSocketChannelFactory( 14 Executors.newCachedThreadPool(), Executors.newCachedThreadPool()); 16
ClientBootstrapbootstrap = newClientBootstrap(16)(factory); 18 bootstrap.setPipelineFactory(newChannelPipelineFactory() { 20 publicChannelPipelinegetPipeline() { returnChannels.pipeline(new TimeClientHandler()); 22 } }); 24 bootstrap.setOption("tcpNoDelay"(17), true); 26 bootstrap.setOption("keepAlive", true); 28 bootstrap.connect(18)(new InetSocketAddress(host, port)); } 30 }
|
|
|
|
|
|
|
Please note that there's no |
|
|
We should call the |
As you can see, it is not really different from the server side startup.
What about the ChannelHandler implementation? It should receive a
32-bit integer from the server, translate it into a human readable format,
print the translated time, and close the connection:
1 package org.jboss.netty.example.time; 2 import java.util.Date; 4 public class TimeClientHandler extendsSimpleChannelHandler{ 6 @Override 8 public void messageReceived(ChannelHandlerContextctx,MessageEvente) {ChannelBufferbuf = (ChannelBuffer) e.getMessage(); 10 long currentTimeMillis = buf.readInt() * 1000L; System.out.println(new Date(currentTimeMillis)); 12 e.getChannel().close(); } 14 @Override 16 public void exceptionCaught(ChannelHandlerContextctx,ExceptionEvente) { e.getCause().printStackTrace(); 18 e.getChannel().close(); } 20 }
It looks very simple and does not look any different from the server side
example. However, this handler sometimes will refuse to work raising an
IndexOutOfBoundsException. We discuss why
this happens in the next section.
7. Dealing with a Stream-based Transport
7.1. One Small Caveat of Socket Buffer
In a stream-based transport such as TCP/IP, received data is stored into a socket receive buffer. Unfortunately, the buffer of a stream-based transport is not a queue of packets but a queue of bytes. It means, even if you sent two messages as two independent packets, an operating system will not treat them as two messages but as just a bunch of bytes. Therefore, there is no guarantee that what you read is exactly what your remote peer wrote. For example, let us assume that the TCP/IP stack of an operating system has received three packets:
  1 +-----+-----+-----+
  2 | ABC | DEF | GHI |
    +-----+-----+-----+
Because of this general property of a stream-based protocol, there's high chance of reading them in the following fragmented form in your application:
  1 +----+-------+---+---+
  2 | AB | CDEFG | H | I |
    +----+-------+---+---+
Therefore, a receiving part, regardless it is server-side or client-side, should defrag the received data into one or more meaningful frames that could be easily understood by the application logic. In case of the example above, the received data should be framed like the following:
  1 +-----+-----+-----+
  2 | ABC | DEF | GHI |
    +-----+-----+-----+
7.2. The First Solution
Now let us get back to the TIME client example. We have the same problem here. A 32-bit integer is a very small amount of data, and it is not likely to be fragmented often. However, the problem is that it can be fragmented, and the possibility of fragmentation will increase as the traffic increases.
The simplistic solution is to create an internal cumulative buffer and
wait until all 4 bytes are received into the internal buffer. The
following is the modified TimeClientHandler
implementation that fixes the problem:
1 package org.jboss.netty.example.time; 2 import static org.jboss.netty.buffer.ChannelBuffers.*; 4 import java.util.Date; 6 public class TimeClientHandler extendsSimpleChannelHandler{ 8 private finalChannelBufferbuf = dynamicBuffer();(19) 10 @Override 12 public void messageReceived(ChannelHandlerContextctx,MessageEvente) {ChannelBufferm = (ChannelBuffer) e.getMessage(); 14 buf.writeBytes(m);(20) 16 if (buf.readableBytes() >= 4) {(21) long currentTimeMillis = buf.readInt() * 1000L; 18 System.out.println(new Date(currentTimeMillis)); e.getChannel().close(); 20 } } 22 @Override 24 public void exceptionCaught(ChannelHandlerContextctx,ExceptionEvente) { e.getCause().printStackTrace(); 26 e.getChannel().close(); } 28 }
|
A dynamic buffer is a |
|
|
First, all received data should be cumulated into
|
|
|
And then, the handler must check if |
7.3. The Second Solution
Although the first solution has resolved the problem with the TIME
client, the modified handler does not look that clean. Imagine a more
complicated protocol which is composed of multiple fields such as a
variable length field. Your ChannelHandler implementation will
become unmaintainable very quickly.
As you may have noticed, you can add more than one ChannelHandler to
a ChannelPipeline, and therefore, you can split one monolithic
ChannelHandler into multiple modular ones to reduce the complexity of
your application. For example, you could split
TimeClientHandler into two handlers:
-
TimeDecoderwhich deals with the fragmentation issue, and -
the initial simple version of
TimeClientHandler.
Fortunately, Netty provides an extensible class which helps you write the first one out of the box:
1 package org.jboss.netty.example.time; 2 public class TimeDecoder extendsFrameDecoder(22) { 4 @Override 6 protected Object decode(ChannelHandlerContextctx,Channelchannel,ChannelBufferbuffer)(23) { 8 if (buffer.readableBytes() < 4) { 10 return null; (24) } 12 return buffer.readBytes(4);(25) 14 } }
|
|
|
|
|
|
|
If |
|
|
If non- |
Now that we have another handler to insert into the ChannelPipeline,
we should modify the ChannelPipelineFactory implementation in the
TimeClient:
1 bootstrap.setPipelineFactory(newChannelPipelineFactory() { 2 publicChannelPipelinegetPipeline() { returnChannels.pipeline( 4 new TimeDecoder(), new TimeClientHandler()); 6 } });
If you are an adventurous person, you might want to try the
ReplayingDecoder which simplifies the decoder even more. You will
need to consult the API reference for more information though.
1 package org.jboss.netty.example.time; 2 public class TimeDecoder extendsReplayingDecoder<VoidEnum> { 4 @Override 6 protected Object decode(ChannelHandlerContextctx,Channelchannel, 8ChannelBufferbuffer,VoidEnumstate) { 10 return buffer.readBytes(4); } 12 }
Additionally, Netty provides out-of-the-box decoders which enables you to implement most protocols very easily and helps you avoid from ending up with a monolithic unmaintainable handler implementation. Please refer to the following packages for more detailed examples:
-
org.jboss.netty.example.factorialfor a binary protocol, and -
org.jboss.netty.example.telnetfor a text line-based protocol.
8. Speaking in POJO instead of ChannelBuffer
All the examples we have reviewed so far used a ChannelBuffer as a
primary data structure of a protocol message. In this section, we will
improve the TIME protocol client and server example to use a
POJO instead of a
ChannelBuffer.
The advantage of using a POJO in your ChannelHandler is obvious;
your handler becomes more maintainable and reusable by separating the
code which extracts information from ChannelBuffer out from the
handler. In the TIME client and server examples, we read only one
32-bit integer and it is not a major issue to use ChannelBuffer directly.
However, you will find it is necessary to make the separation as you
implement a real world protocol.
First, let us define a new type called UnixTime.
  1 package org.jboss.netty.example.time;
  2
    import java.util.Date;
  4
    public class UnixTime {
  6     private final int value;

  8     public UnixTime(int value) {
            this.value = value;
 10     }

 12     public int getValue() {
            return value;
 14     }

 16     @Override
        public String toString() {
 18         return new Date(value * 1000L).toString();
        }
 20 }
We can now revise the TimeDecoder to return
a UnixTime instead of a ChannelBuffer.
1 @Override 2 protected Object decode(ChannelHandlerContextctx,Channelchannel,ChannelBufferbuffer) { 4 if (buffer.readableBytes() < 4) { return null; 6 } 8 return new UnixTime(buffer.readInt());(26) }
|
|
With the updated decoder, the TimeClientHandler
does not use ChannelBuffer anymore:
1 @Override 2 public void messageReceived(ChannelHandlerContextctx,MessageEvente) { UnixTime m = (UnixTime) e.getMessage(); 4 System.out.println(m); e.getChannel().close(); 6 }
Much simpler and elegant, right? The same technique can be applied on
the server side. Let us update the
TimeServerHandler first this time:
1 @Override 2 public void channelConnected(ChannelHandlerContextctx,ChannelStateEvente) { UnixTime time = new UnixTime(System.currentTimeMillis() / 1000); 4ChannelFuturef = e.getChannel().write(time); f.addListener(ChannelFutureListener.CLOSE); 6 }
Now, the only missing piece is an encoder, which is an implementation of
ChannelHandler that translates a UnixTime back
into a ChannelBuffer. It's much simpler than writing a decoder because
there's no need to deal with packet fragmentation and assembly when
encoding a message.
1 package org.jboss.netty.example.time; 2 import static org.jboss.netty.buffer.ChannelBuffers.*; 4 public class TimeEncoder extendsSimpleChannelHandler{ 6 public void writeRequested(ChannelHandlerContextctx,MessageEvent(27) e) { 8 UnixTime time = (UnixTime) e.getMessage(); 10ChannelBufferbuf = buffer(4); buf.writeInt(time.getValue()); 12Channels.write(ctx, e.getFuture(), buf);(28) 14 } }
|
An encoder overrides the |
|
|
Once done with transforming a POJO into a
On the other hand, it is a good idea to use static imports for
1 import static org.jboss.netty.channel. |
The last task left is to insert a TimeEncoder
into the ChannelPipeline on the server side, and it is left as a
trivial exercise.
9. Shutting Down Your Application
If you ran the TimeClient, you must have noticed
that the application doesn't exit but just keep running doing nothing.
Looking from the full stack trace, you will also find a couple I/O threads
are running. To shut down the I/O threads and let the application exit
gracefully, you need to release the resources allocated by ChannelFactory.
The shutdown process of a typical network application is composed of the following three steps:
-
Close all server sockets if there are any,
-
Close all non-server sockets (i.e. client sockets and accepted sockets) if there are any, and
-
Release all resources used by
ChannelFactory.
To apply the three steps above to the TimeClient,
TimeClient.main() could shut itself down
gracefully by closing the only one client connection and releasing all
resources used by ChannelFactory:
1 package org.jboss.netty.example.time; 2 public class TimeClient { 4 public static void main(String[] args) throws Exception { ... 6ChannelFactoryfactory = ...;ClientBootstrapbootstrap = ...; 8 ...ChannelFuturefuture(29) = bootstrap.connect(...); 10 future.awaitUninterruptibly();(30) if (!future.isSuccess()) { 12 future.getCause().printStackTrace();(31) } 14 future.getChannel().getCloseFuture().awaitUninterruptibly();(32) factory.releaseExternalResources();(33) 16 } }
|
The |
|
|
Wait for the returned |
|
|
If failed, we print the cause of the failure to know why it failed.
the |
|
|
Now that the connection attempt is over, we need to wait until the
connection is closed by waiting for the
Even if the connection attempt has failed the |
|
|
All connections have been closed at this point. The only task left
is to release the resources being used by |
Shutting down a client was pretty easy, but how about shutting down a
server? You need to unbind from the port and close all open accepted
connections. To do this, you need a data structure that keeps track of
the list of active connections, and it's not a trivial task. Fortunately,
there is a solution, ChannelGroup.
ChannelGroup is a special extension of Java collections API which
represents a set of open Channels. If a Channel is added to a
ChannelGroup and the added Channel is closed, the closed Channel
is removed from its ChannelGroup automatically. You can also perform
an operation on all Channels in the same group. For instance, you can
close all Channels in a ChannelGroup when you shut down your server.
To keep track of open sockets, you need to modify the
TimeServerHandler to add a new open Channel to
the global ChannelGroup, TimeServer.allChannels:
1 @Override 2 public void channelOpen(ChannelHandlerContextctx,ChannelStateEvente) { TimeServer.allChannels.add(e.getChannel());(34) 4 }
|
Yes, |
Now that the list of all active Channels are maintained automatically,
shutting down a server is as easy as shutting down a client:
1 package org.jboss.netty.example.time; 2 public class TimeServer { 4 static finalChannelGroupallChannels = newDefaultChannelGroup("time-server"(35)); 6 public static void main(String[] args) throws Exception { 8 ...ChannelFactoryfactory = ...; 10ServerBootstrapbootstrap = ...; ... 12Channelchannel(36) = bootstrap.bind(...); allChannels.add(channel);(37) 14 waitForShutdownCommand();(38)ChannelGroupFuturefuture = allChannels.close();(39) 16 future.awaitUninterruptibly(); factory.releaseExternalResources(); 18 } }
|
|
|
|
The |
|
|
Any type of |
|
|
|
|
|
You can perform the same operation on all channels in the same
|
10. Summary
In this chapter, we had a quick tour of Netty with a demonstration on how to write a fully working network application on top of Netty.
There is more detailed information about Netty in the upcoming chapters. We also encourage you to review the Netty examples in the org.jboss.netty.example package.
Please also note that the community is always waiting for your questions and ideas to help you and keep improving Netty based on your feed back.
Chapter 2. Architectural Overview
Table of Contents
In this chapter, we will examine what core functionalities are provided in Netty and how they constitute a complete network application development stack on top of the core. Please keep this diagram in mind as you read this chapter.
Also keep in mind that a lot of the detailed documentation is in the javadoc. Please click on links to class names and package names.
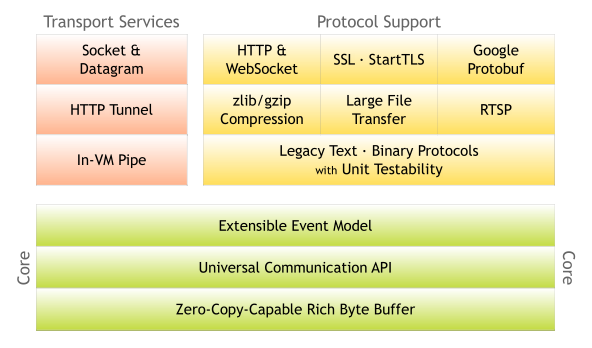
1. Rich Buffer Data Structure
Netty uses its own buffer API instead of NIO ByteBuffer
to represent a sequence of bytes. This approach has significant advantages
over using ByteBuffer. Netty's new buffer type,
ChannelBuffer has been designed from the ground up to address the problems
of ByteBuffer and to meet the daily needs of
network application developers. To list a few cool features:
-
You can define your own buffer type if necessary.
-
Transparent zero copy is achieved by a built-in composite buffer type.
-
A dynamic buffer type is provided out-of-the-box, whose capacity is expanded on demand, just like
StringBuffer. -
There's no need to call
flip()anymore. -
It is often faster than
ByteBuffer.
For more information, please refer to the
org.jboss.netty.buffer package description.
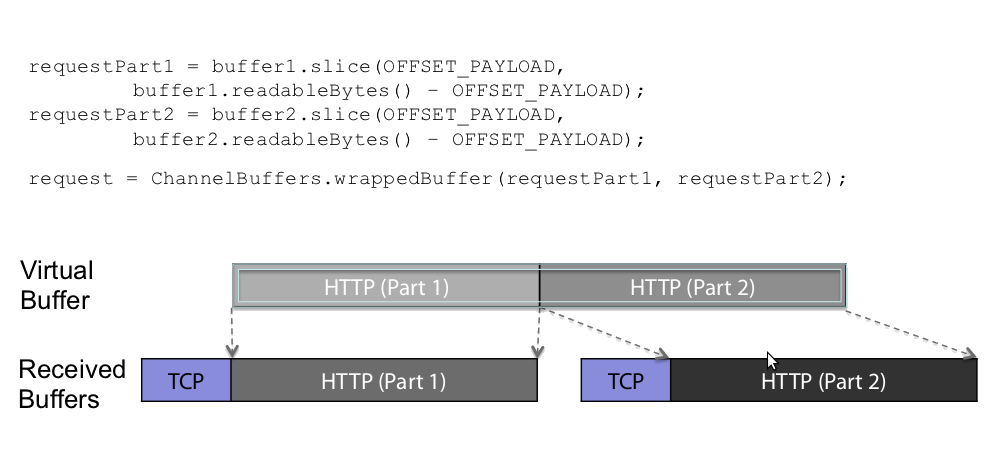
1.1. Combining and Slicing ChannelBuffers
When transfering data between communication layers, data often needs to be combined or sliced. For example, if a payload is split over multiple packages, it often needs to be be combined for decoding.
Traditionally, data from the multiple packages are combined by copying them into a new byte buffer.
Netty supports a zero-copy approach where by a ChannelBuffer "points" to the required
buffers hence eliminating the need to perform a copy.
2. Universal Asynchronous I/O API
Traditional I/O APIs in Java provide different types and methods for
different transport types. For example,
java.net.Socket and
java.net.DatagramSocket do not have any common
super type and therefore they have very different ways to perform socket
I/O.
This mismatch makes porting a network application from one transport to another tedious and difficult. The lack of portability between transports becomes a problem when you need to support additional transports, as this often entails rewriting the network layer of the application. Logically, many protocols can run on more than one transport such as TCP/IP, UDP/IP, SCTP, and serial port communication.
To make matters worse, Java's New I/O (NIO) API introduced incompatibilities with the old blocking I/O (OIO) API and will continue to do so in the next release, NIO.2 (AIO). Because all these APIs are different from each other in design and performance characteristics, you are often forced to determine which API your application will depend on before you even begin the implementation phase.
For instance, you might want to start with OIO because the number of clients you are going to serve will be very small and writing a socket server using OIO is much easier than using NIO. However, you are going to be in trouble when your business grows exponentially and your server needs to serve tens of thousands of clients simultaneously. You could start with NIO, but doing so may hinder rapid development by greatly increasing development time due to the complexity of the NIO Selector API.
Netty has a universal asynchronous I/O interface called a Channel, which
abstracts away all operations required for point-to-point communication.
That is, once you wrote your application on one Netty transport, your
application can run on other Netty transports. Netty provides a number
of essential transports via one universal API:
-
NIO-based TCP/IP transport (See
org.jboss.netty.channel.socket.nio), -
OIO-based TCP/IP transport (See
org.jboss.netty.channel.socket.oio), -
OIO-based UDP/IP transport, and
-
Local transport (See
org.jboss.netty.channel.local).
ChannelFactory
implementation.
Also, you are even able to take advantage of new transports which aren't yet written (such as serial port communication transport), again by replacing just a couple lines of constructor calls. Moreover, you can write your own transport by extending the core API.
3. Event Model based on the Interceptor Chain Pattern
A well-defined and extensible event model is a must for an event-driven application. Netty has a well-defined event model focused on I/O. It also allows you to implement your own event type without breaking the existing code because each event type is distinguished from another by a strict type hierarchy. This is another differentiator against other frameworks. Many NIO frameworks have no or a very limited notion of an event model. If they offer extension at all, they often break the existing code when you try to add custom event types
A ChannelEvent is handled by a list of ChannelHandlers in a
ChannelPipeline. The pipeline implements an advanced form of the
Intercepting Filter
pattern to give a user full control over how an event is handled and how
the handlers in the pipeline interact with each other. For example,
you can define what to do when data is read from a socket:
1 public class MyReadHandler implementsSimpleChannelHandler{ 2 public void messageReceived(ChannelHandlerContextctx,MessageEventevt) { Object message = evt.getMessage(); 4 // Do something with the received message. ... 6 // And forward the event to the next handler. 8 ctx.sendUpstream(evt); } 10 }
You can also define what to do when a handler receives a write request:
1 public class MyWriteHandler implementsSimpleChannelHandler{ 2 public void writeRequested(ChannelHandlerContextctx,MessageEventevt) { Object message = evt.getMessage(); 4 // Do something with the message to be written. ... 6 // And forward the event to the next handler. 8 ctx.sendDownstream(evt); } 10 }
For more information on the event model, please refer to the
API documentation of ChannelEvent and ChannelPipeline.
4. Advanced Components for More Rapid Development
On top of the core components mentioned above, that already enable the implementation of all types of network applications, Netty provides a set of advanced features to accelerate the page of development even more.
4.1. Codec framework
As demonstrated in Section 8, “ Speaking in POJO instead of ChannelBuffer ”, it is always a good idea to separate a protocol codec from business logic. However, there are some complications when implementing this idea from scratch. You have to deal with the fragmentation of messages. Some protocols are multi-layered (i.e. built on top of other lower level protocols). Some are too complicated to be implemented in a single state machine.
Consequently, a good network application framework should provide an extensible, reusable, unit-testable, and multi-layered codec framework that generates maintainable user codecs.
Netty provides a number of basic and advanced codecs to address most issues you will encounter when you write a protocol codec regardless if it is simple or not, binary or text - simply whatever.
4.2. SSL / TLS Support
Unlike old blocking I/O, it is a non-trivial task to support SSL in NIO.
You can't simply wrap a stream to encrypt or decrypt data but you have
to use javax.net.ssl.SSLEngine.
SSLEngine is a state machine which is as complex
as SSL itself. You have to manage all possible states such as cipher
suite and encryption key negotiation (or re-negotiation), certificate
exchange, and validation. Moreover, SSLEngine is
not even completely thread-safe, as one would expect.
In Netty, SslHandler takes care of all the gory details and pitfalls
of SSLEngine. All you need to do is to configure
the SslHandler and insert it into your ChannelPipeline. It also
allows you to implement advanced features like
StartTLS
very easily.
4.3. HTTP Implementation
HTTP is definitely the most popular protocol in the Internet. There are already a number of HTTP implementations such as a Servlet container. Then why does Netty have HTTP on top of its core?
Netty's HTTP support is very different from the existing HTTP libraries. It gives you complete control over how HTTP messages are exchanged at a low level. Because it is basically the combination of an HTTP codec and HTTP message classes, there is no restriction such as an enforced thread model. That is, you can write your own HTTP client or server that works exactly the way you want. You have full control over everything that's in the HTTP specification, including the thread model, connection life cycle, and chunked encoding.
Thanks to its highly customizable nature, you can write a very efficient HTTP server such as:
-
Chat server that requires persistent connections and server push technology (e.g. Comet)
-
Media streaming server that needs to keep the connection open until the whole media is streamed (e.g. 2 hours of video)
-
File server that allows the uploading of large files without memory pressure (e.g. uploading 1GB per request)
-
Scalable mash-up client that connects to tens of thousands of 3rd party web services asynchronously
4.4. WebSockets Implementation
WebSockets allows for a bi-directional, full-duplex communications channels, over a single Transmission Control Protocol (TCP) socket. It is designed to allow streaming of data between a web browser and a web server.
The WebSocket protocol has been standardized by the IETF as RFC 6455.
Netty implementes RFC 6455 and a number of older versions of the specification. Please refer to the org.jboss.netty.handler.codec.http.websocketx package and associated examples.
4.5. Google Protocol Buffer Integration
Google Protocol Buffers
are an ideal solution for the rapid implementation of a highly efficient
binary protocols that evolve over time. With ProtobufEncoder and
ProtobufDecoder, you can turn the message classes generated by the
Google Protocol Buffers Compiler (protoc) into Netty codec. Please take
a look into the
'LocalTime' example
that shows how easily you can create a high-performing binary protocol
client and server from the
sample protocol definition.
5. Summary
In this chapter, we reviewed the overall architecture of Netty from the feature standpoint. Netty has a simple, yet powerful architecture. It is composed of three components - buffer, channel, and event model - and all advanced features are built on top of the three core components. Once you understood how these three work together, it should not be difficult to understand the more advanced features which were covered briefly in this chapter.
You might still have unanswered questions about what the overall architecture looks like exactly and how each of the features work together. If so, it is a good idea to talk to us to improve this guide.
Frequently Asked Questions
Table of Contents
This FAQ is a summary of question and answers from StackOverflow.
1. When can I write downstream data?
As long as you have the reference to the Channel (or ChannelHandlerContext), you can call Channel.write() (or Channels.write()) from anywhere, any thread.
writeRequested() is called when you trigger the writeRequested event by calling Channel.write() or calling ChannelHandlerContext.sendDownstream(MessageEvent).
See discussion.
2. How do I incorporate my blocking application code with the non-blocking NioServerSocketChannelFactory?
NioServerSocketChannelFactory uses boss threads and worker threads.
Boss threads are responsible for accepting incoming connections while worker threads are reponsible for performing non-blocking read and write for associated channels. The default number of worker threads in the pool is 2 * the number of available processors.
If your applicaiton's handler blocks such as (reading from a database) or is CPU intensive, the worker thread pool maybe exhausted and performance will degrade.
We recommend that you implement your blocking application code in another thread pool. You can do this by adding OrderedMemoryAwareThreadPoolExecutor to the the channel pipeline before your handler or implement your own.
  1 public static void main(String[] args) throws Exception {
  2         OrderedMemoryAwareThreadPoolExecutor eventExecutor =
                new OrderedMemoryAwareThreadPoolExecutor(
  4                     5, 1000000, 10000000, 100,
                        TimeUnit.MILLISECONDS);
  6
            ServerBootstrap bootstrap = new ServerBootstrap(
  8                 new NioServerSocketChannelFactory(
                            Executors.newCachedThreadPool(),
 10                         Executors.newCachedThreadPool()));

 12         sb.setPipelineFactory(new MyPipelineFactory(eventExecutor));
            sb.bind(socketAddress);
 14
            // Other code
 16
            return;
 18     }

 20     public class MyPipelineFactory implements ChannelPipelineFactory {
        @Override
 22     public ChannelPipeline getPipeline() throws Exception {
            // Create a default pipeline implementation.
 24         ChannelPipeline pipeline = pipeline();

 26         pipeline.addLast("decoder", new HttpRequestDecoder());
            pipeline.addLast("aggregator", new HttpChunkAggregator(65536));
 28         pipeline.addLast("encoder", new HttpResponseEncoder());
            pipeline.addLast("chunkedWriter", new ChunkedWriteHandler());
 30
            // Insert OrderedMemoryAwareThreadPoolExecutor before your blocking handler
 32         pipeline.addLast("pipelineExecutor", new ExecutionHandler(_pipelineExecutor));

 34         // MyHandler contains code that blocks
            pipeline.addLast("handler", new MyHandler());
 36
            return pipeline;
 38     }

 40     public class MyHandler extends SimpleChannelUpstreamHandler {
            // Your blocking application code
 42 }
3. Do I need to synchronize my handler code given that events can happen at the same time?
Your ChannelUpstreamHandler will be invoked sequentially by the same thread (i.e. an I/O thread) and
therefore a handler does not need to worry about being invoked with a new upstream
event before the
previous upstream event is finished.
However, downstream events can be fired by more than one thread simultaneously. If
your ChannelDownstreamHandler
accesses a shared resource or stores stateful information, you might need proper synchronization.
See discussion.
4. How do I pass data between handlers in the same Channel?
Use ChannelLocal.
  1
  2     // Declare
        public static final ChannelLocal<int> data = new ChannelLocal<int>();
  4
        // Set
  6     data.set(e.getChannel(), 1);

  8     // Get
        int a = data.get(e.getChannel());
See discussion.