-
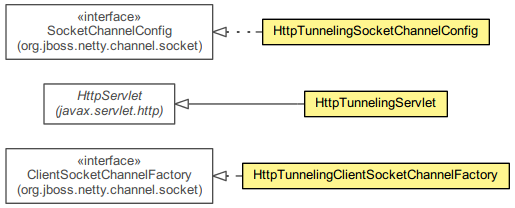
Class Summary Class Description HttpTunnelingClientSocketChannelFactory Creates a client-sideSocketChannelwhich connects to anHttpTunnelingServletto communicate with the server application behind theHttpTunnelingServlet.HttpTunnelingServlet AnHttpServletthat proxies an incoming data to the actual server and vice versa.HttpTunnelingSocketChannelConfig TheChannelConfigof a client-side HTTP tunnelingSocketChannel.
Package org.jboss.netty.channel.socket.http Description
An HTTP-based client-side
SocketChannel
and its corresponding server-side Servlet implementation that make your
existing server application work in a firewalled network.
Deploying the HTTP tunnel as a Servlet
First,HttpTunnelingServlet must be
configured in a web.xml.
 <?xml version="1.0" encoding="UTF-8"?>
 <web-app xmlns="http://java.sun.com/xml/ns/j2ee"
             xmlns:xsi="http://www.w3.org/2001/XMLSchema-instance"
             xsi:schemaLocation="http://java.sun.com/xml/ns/j2ee http://java.sun.com/xml/ns/j2ee/web-app_2_4.xsd"
             version="2.4">

   <servlet>
     <servlet-name>NettyTunnelingServlet</servlet-name>
     <servlet-class>org.jboss.netty.channel.socket.http.HttpTunnelingServlet</servlet-class>
     <!--
       The name of the channel, this should be a registered local channel.
       See LocalTransportRegister.
     -->
     <init-param>
       <param-name>endpoint</param-name>
       <param-value>local:myLocalServer</param-value>
     </init-param>
     <load-on-startup>1</load-on-startup>
   </servlet>

   <servlet-mapping>
     <servlet-name>NettyTunnelingServlet</servlet-name>
     <url-pattern>/netty-tunnel</url-pattern>
   </servlet-mapping>
 </web-app>
Second, you have to bind your Netty-based server application in the same
Servlet context or shared class loader space using the local transport
(see LocalServerChannelFactory.)
You can use your favorite IoC framework such as JBoss Microcontainer, Guice,
and Spring to do this. The following example shows how to bind an echo
server to the endpoint specifed above (web.xml) in JBossAS 5:
 <bean name="my-local-echo-server"
       class="org.jboss.netty.example.http.tunnel.LocalEchoServerRegistration" />

 ...

 package org.jboss.netty.example.http.tunnel;
 ...

 public class LocalEchoServerRegistration {

     private final ChannelFactory factory = new DefaultLocalServerChannelFactory();
     private volatile Channel serverChannel;

     public void start() {
         ServerBootstrap serverBootstrap = new ServerBootstrap(factory);
         EchoHandler handler = new EchoHandler();
         serverBootstrap.getPipeline().addLast("handler", handler);

         // Note that "myLocalServer" is the endpoint which was specified in web.xml.
         serverChannel = serverBootstrap.bind(new LocalAddress("myLocalServer"));
     }

     public void stop() {
         serverChannel.close();
     }
 }
Connecting to the HTTP tunnel
Once the tunnel has been configured, your client-side application needs only a couple lines of changes.
 ClientBootstrap b = new ClientBootstrap(
         new HttpTunnelingClientSocketChannelFactory(
                 new NioClientSocketChannelFactory(...)));

 // Configure the pipeline (or pipeline factory) here.
 ...

 // The host name of the HTTP server
 b.setOption("serverName", "example.com");
 // The path to the HTTP tunneling Servlet, which was specified in in web.xml
 b.setOption("serverPath", "contextPath/netty-tunnel");
 b.connect(new InetSocketAddress("example.com", 80);
For more configuration parameters such as HTTPS options,
refer to HttpTunnelingSocketChannelConfig.